We run a few small internal automations, and we got tired of opening a dashboard every time we needed one of them. So we moved them to Slack: type a command, get an answer, done.
The tricky part isn't calling a Lambda from Slack, that's easy. The tricky part is making sure the request actually came from Slack, and not from someone who just found your URL.
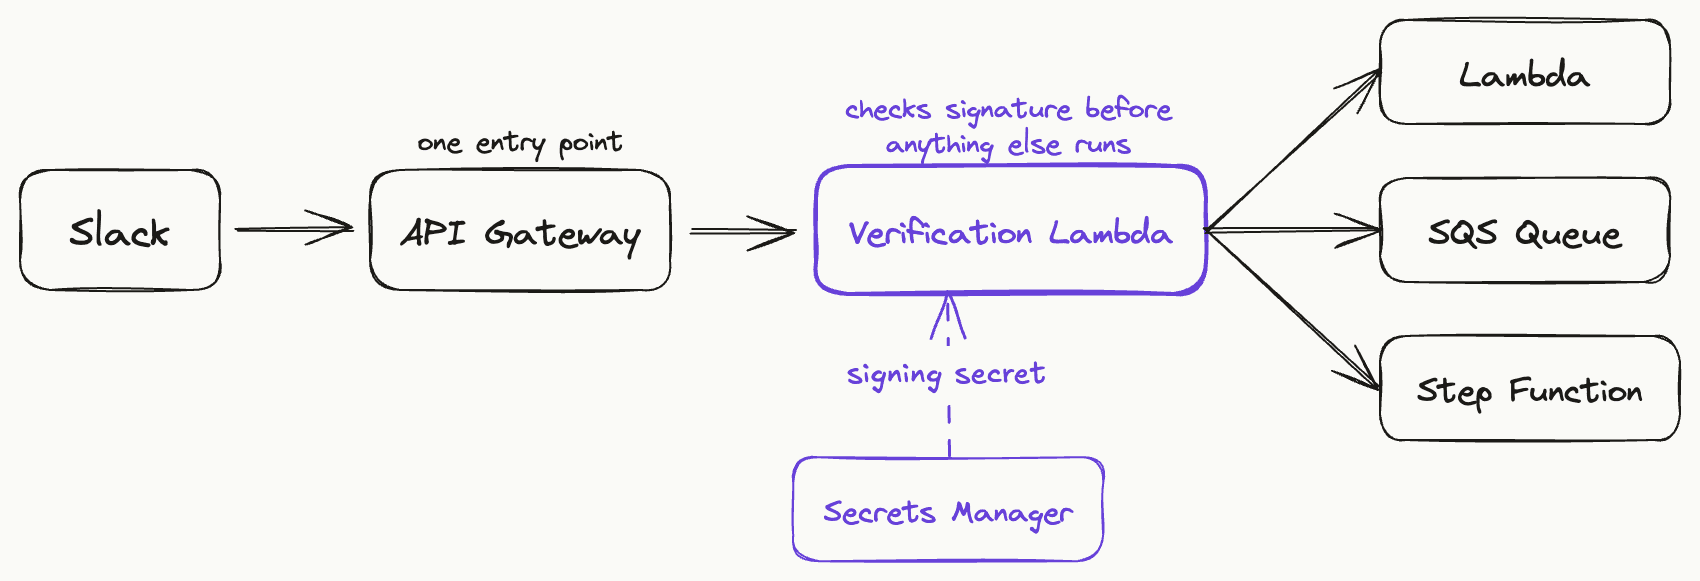
Here's the setup we used: one API Gateway in front of everything, a small Lambda that checks every request before anything else runs, and that same request then gets routed to whatever it's meant to trigger. The specifics below are generic enough to reuse for your own commands.
What this actually is
Three pieces, that's it:
- A Slack app with one or more slash commands, all pointing at the same API Gateway.
- An API Gateway that's the one public entry point — one URL, one place to check logs, one place to set rate limits.
- A small Lambda that checks every request is really from Slack before anything else runs, then passes it on to whatever's supposed to handle it.
This isn't really Slack-specific. Swap Slack for any webhook or third-party sender and the shape stays the same: check who sent it, then route it. Slack is just a good example to learn from, since its verification rules are well documented and strict enough to show exactly where people usually go wrong with API Gateway.
Why build automations this way
A few things get easier once this is in place:
- Slack becomes the interface. No separate internal tool to build or maintain — people are already there.
- One thing to secure. Instead of five public endpoints scattered across five services, you have one Gateway to watch.
- Verification stays separate from the actual work. The function that checks “is this really Slack” doesn't need to know anything about balances, deploys, or whatever the command does. Keeps each piece small.
- New commands are cheap to add. Once verification exists, a new automation is just a new route and a new Lambda, not a new security review.
How to make it secure
Slack signs every request it sends. Along with the usual headers, you get X-Slack-Signature and X-Slack-Request-Timestamp. You're expected to rebuild that signature yourself from the raw body Slack sent, and check it matches. The formula is short:
sig_basestring = “v0:” + timestamp + “:” + raw_body
my_signature   = “v0=” + HMAC_SHA256(signing_secret, sig_basestring)

# valid if my_signature matches the X-Slack-Signature header
The signing secret comes from your Slack app's settings. Everything else, the timestamp and the body, comes from the request itself.
The obvious place to put this check is an API Gateway Lambda Authorizer, since checking requests is its whole job. But it won't work, and it's worth knowing why so you don't lose an afternoon to it.
An Authorizer runs before API Gateway has even read the request body. It only gets headers, query params, path params, and stage variables, no body. This isn't a setting you can change or a workaround you're missing, it's just how that step works. The body only shows up once the request reaches the actual integration.
| Component | Has request body? | Can verify Slack's signature? |
|---|---|---|
| API Gateway Lambda Authorizer | No | No |
| Dedicated verification Lambda (as the integration itself) | Yes | Yes |
| The main / business-logic Lambda | Yes | Yes |
So instead of a separate Authorizer resource, use a plain Lambda as the integration itself, and make signature-checking the first thing it does. It behaves the same way an authorizer would (reject bad requests early), it's just placed where the raw body actually exists.
import hmac, hashlib, os, time

def verify_slack_signature(event):
    headers = event["headers"]
    signature = headers.get("x-slack-signature")
    timestamp = headers.get("x-slack-request-timestamp")
    raw_body = event["body"] # only available here, never in an Authorizer

    if not signature or not timestamp:
        return False

    # reject anything older than 5 minutes — basic replay protection
    ifabs(time.time() - int(timestamp)) > 60 * 5:
        return False

    signing_secret = get_signing_secret() # from Secrets Manager, cached
    basestring = f"v0:{timestamp}:{raw_body}"
    computed = "v0=" + hmac.new(
        signing_secret.encode(),
        basestring.encode(),
        hashlib.sha256
    ).hexdigest()

    # constant-time comparison — never use == for secrets
    return hmac.compare_digest(computed, signature)
Keep Lambda Proxy Integration on for this route, and skip mapping templates. A mapping template can quietly reshape the body before your function sees it, and a reshaped body will never match the signature Slack computed on the original.
How one API Gateway can trigger many parts of your infra
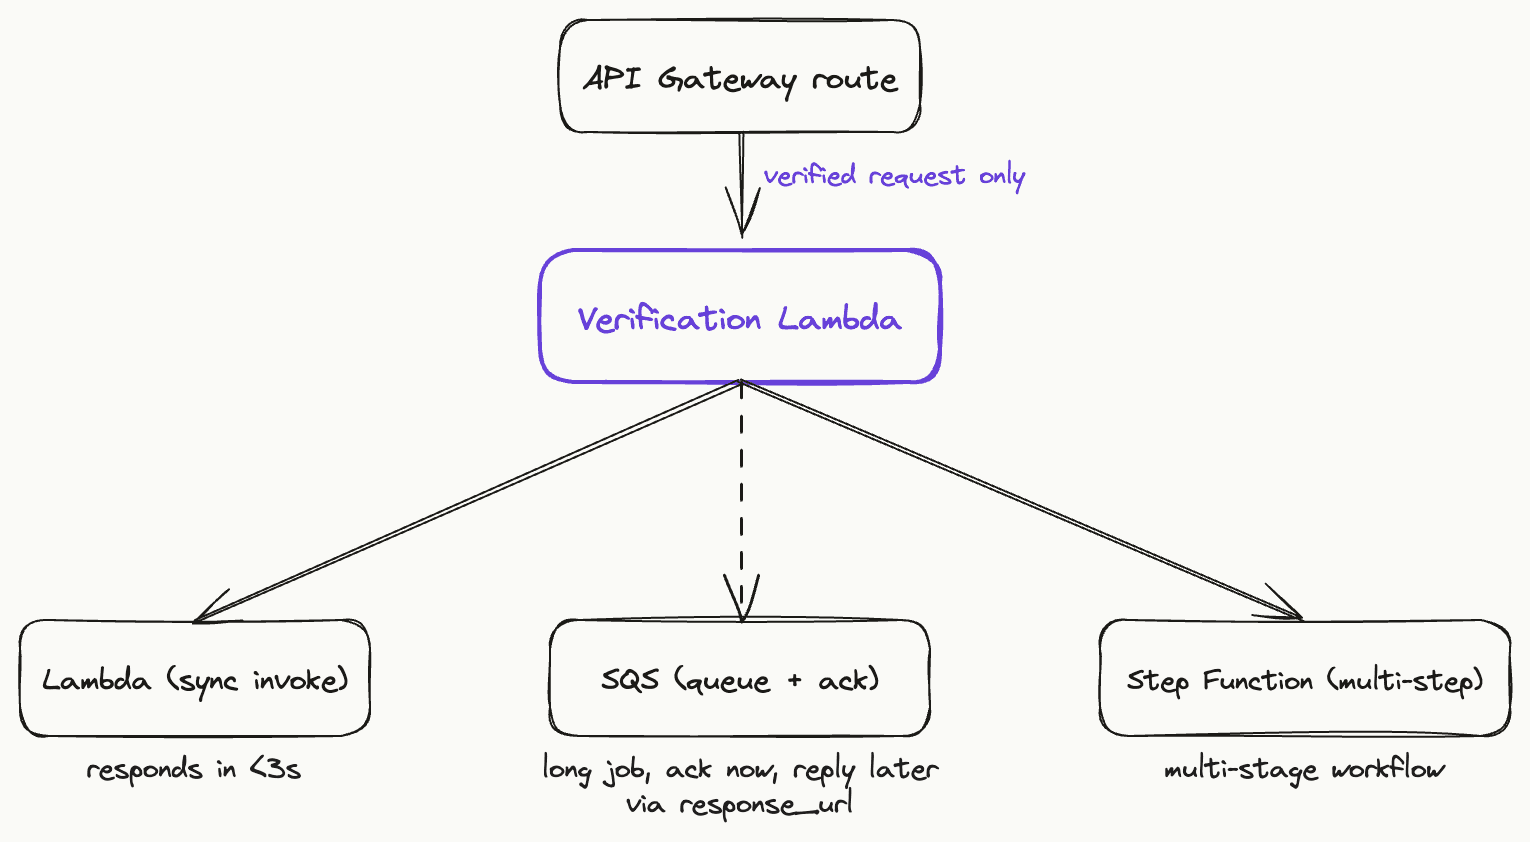
Once a request passes verification, nothing says the same function has to handle it. That's the whole point of checking it in one place: the Gateway becomes a single funnel that verifies once, then routes to whatever needs to run.
What that routing looks like depends on how long the job takes:
- Direct Lambda invoke — for anything fast enough to fit Slack's response window, just call the target Lambda and pass its reply straight back.
- Queue and acknowledge — for slower jobs, drop a message on SQS, tell Slack “on it,” and post the real answer later using Slack's
response_url. - Step Functions — for anything multi-stage (validate → call an API → write a record → notify), use a state machine instead of chaining Lambdas by hand.
- EventBridge — if one command needs to reach several independent consumers, publish an event and let each one subscribe.
There are two ways to structure this. Give each command its own path (/slack/deploy, /slack/status) with the same verification logic copied into each, either as a shared Lambda Layer, or route everything through one gatekeeper Lambda that forwards based on the command name. We went with the gatekeeper: one place to update if Slack ever changes how signing works.
Validating every request, not just the first one
Signature verification answers “did this come from Slack.” A few more checks are cheap and worth adding on top:
- Timestamp window. Reject anything older than a few minutes, so a captured request can't be replayed later.
- Constant-time comparison. Use a timing-safe compare (
hmac.compare_digestin Python,crypto.timingSafeEqualin Node) for the signature check. A plain==can leak timing info. - Workspace ID allow-list. If only one Slack workspace should ever call you, check
team_idagainst a known value. A second, independent gate. - Scoped IAM per function. The verification Lambda should only be allowed to invoke the specific functions it's meant to trigger, not everything in the account.
- Don't log the raw body or the signing secret. Easy to forget when you're debugging. Strip sensitive fields first.
Limitations worth knowing up front
None of these are dealbreakers, but good to know before you build around them:
- Authorizers can't see the body. Covered above, but it's the one that trips people up the most.
- Slack's 3-second deadline is tighter than API Gateway's own timeout. API Gateway allows up to 29 seconds, but Slack expects a response in about 3. Anything slower needs the acknowledge-then-follow-up pattern with
response_url. - Payload size limits. Slack's payloads are small, so this rarely comes up, but API Gateway does cap request size.
- Throttling is account and region wide by default. A burst on one route can eat into headroom for another unless you set per-route limits.
- Cold starts add latency right where you can't afford it. With a 3-second budget, a cold Lambda start on the verification hop is a real risk. Keep it lean, or use provisioned concurrency.
- Authorizer caching, if you use one elsewhere. Fine for routes with a real Authorizer, but easy to forget it's on when you expect every request re-checked.
Managing a lot of routes under one Gateway
This only stays pleasant if the Gateway itself stays organized as you add more automations. A few habits that helped:
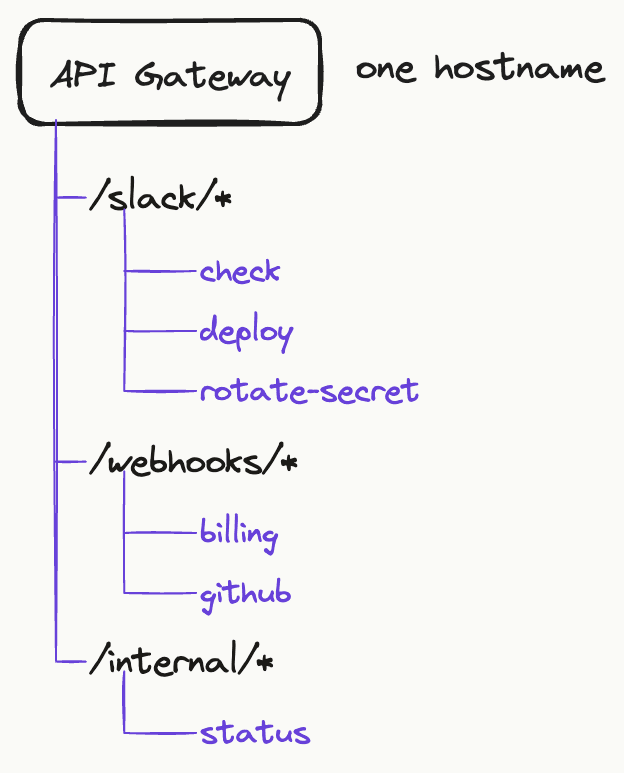
- Group routes by domain, not by who built them last —
/slack/*for slash commands,/webhooks/*for third-party callbacks,/internal/*for everything else. - Use stages instead of separate Gateways for dev/staging/prod. Same routes, different Lambdas per stage variable.
- Usage plans and API keys if different consumers need different throttling — not needed for a single Slack workspace, but useful the moment a second tool starts calling in.
- A custom domain with base path mapping keeps one hostname across everything, instead of handing out raw
execute-apiURLs. - Consistent tagging and naming so logs and billing stay traceable back to a specific route.
- Move to IaC once the route count grows. Clicking through the console is fine for two or three routes. Past that, Terraform, SAM, or CDK saves you from drift you won't notice until something breaks.
Setting it up end to end
This is the concrete version — Slack side first, then AWS. Swap names and regions for your own.
1. Slack side
- Create an app at api.slack.com/apps.
- Go to Slash Commands → Create New Command. Set the command (e.g.
/check) and leave the Request URL as a placeholder for now — you'll fill it in after the Gateway is deployed. - Open Basic Information and copy the Signing Secret. This is the only credential you need from Slack for verification.
- Install the app to your workspace.
2. Store the signing secret
aws secretsmanager create-secret \
  --name slack/signing-secret \
  --secret-string "your-signing-secret-here" \
  --region ap-south-2
3. Create the verification Lambda's execution role
Keep it scoped to exactly what it needs — read one secret, invoke specific downstream functions, write its own logs.
{
  "Version": "2012-10-17",
  "Statement": [
    {
      "Sid": "ReadSigningSecret",
      "Effect": "Allow",
      "Action": "secretsmanager:GetSecretValue",
      "Resource": "arn:aws:secretsmanager:ap-south-2:<ACCOUNT_ID>:secret:slack/signing-secret-*"
    },
    {
      "Sid": "InvokeDownstreamFunctions",
      "Effect": "Allow",
      "Action": "lambda:InvokeFunction",
      "Resource": [
        "arn:aws:lambda:ap-south-2:<ACCOUNT_ID>:function:slack-check-balance",
        "arn:aws:lambda:ap-south-2:<ACCOUNT_ID>:function:slack-deploy-handler"
      ]
    },
    {
      "Sid": "WriteLogs",
      "Effect": "Allow",
      "Action": [
        "logs:CreateLogGroup",
        "logs:CreateLogStream",
        "logs:PutLogEvents"
      ],
      "Resource": "*"
    }
  ]
}
4. Deploy the verification Lambda
Package the verification code (like the verify.py snippet above) with logic to route to the right downstream target once a request passes. Fetch the signing secret once per cold start and cache it in a module-level variable — no need to hit Secrets Manager on every invocation.
5. Wire up API Gateway
- Create a resource, e.g.
/slack/check, with aPOSTmethod. - Integration type: Lambda function, with Lambda proxy integration turned on — this is what guarantees the raw body reaches your function untouched.
- Repeat for each additional command / route you're adding, pointing them all at the same verification Lambda (or its own thin wrapper, per the layer-vs-gatekeeper choice above).
- Deploy the API to a stage (e.g.
prod) to get your invoke URL.
6. Grant API Gateway permission to invoke the Lambda
aws lambda add-permission \
  --function-name slack-verify-and-route \
  --statement-id apigw-invoke \
  --action lambda:InvokeFunction \
  --principal apigateway.amazonaws.com \
  --source-arn "arn:aws:execute-api:ap-south-2:<ACCOUNT_ID>:<API_ID>/*/POST/slack/check" \
  --region ap-south-2
7. Point Slack at the real URL
Go back to your Slack app's Slash Command settings and update the Request URL to your API Gateway invoke URL, e.g. https://<api-id>.execute-api.ap-south-2.amazonaws.com/prod/slack/check.
8. Test before trusting it
You can simulate a real Slack request by computing a valid signature yourself:
const crypto = require("crypto");
const secret = "your-signing-secret-here";
const ts = Math.floor(Date.now() / 1000).toString();
const body = "token=test&team_id=T1&user_id=U123&command=%2Fcheck";
const basestring = `v0:${ts}:${body}`;
const sig = "v0=" + crypto.createHmac("sha256", secret).update(basestring).digest("hex");
console.log({ ts, sig, body });
curl -X POST "https://<api-id>.execute-api.ap-south-2.amazonaws.com/prod/slack/check" \
  -H "X-Slack-Request-Timestamp: <ts from sign.js>" \
  -H "X-Slack-Signature: <sig from sign.js>" \
  -d "token=test&team_id=T1&user_id=U123&command=%2Fcheck"
Once that round-trips correctly, run it for real from Slack. Then add a second command pointing at a different downstream target to confirm the fan-out actually fans out — that's the whole point of putting verification in one place instead of duplicating it per route.
Wrapping up
It's a small pattern once it's written down: one entry point, one place that decides if a request is real, and a routing layer that hands it off to whatever needs to run. The part that actually matters is knowing where in the request lifecycle you can see what you need, and building around that instead of fighting it. Once that clicks, adding the next automation is just a new route.